Here you will learn about difference between LAN, MAN and WAN.
Also Read: IPv4 vs IPv6 - Difference between IPv4 and IPv6
Various standards were developed for WLAN which are IEEE 802.11a, 11b, 11g and 11n. Most of the WiFi enabled devices today supports IEEE 802.11n standard.
LANs provides following properties to the user :-

LAN
LAN stands for Local Area Network which ranges from small houses to small buildings. LAN works on different topologies such as Bus, star, ring, mesh, etc. In a small Organisation LAN is generally used as it provides many advantages such as high speed, reliable connections etc. LANs are easy to configure and operate as it includes less nodes or lesser number of computer systems connected to it. LAN is commonly called as Ethernet. It usually has 5-100 computers connected to it. LANs provides data transfer rates of upto 1gbps. LAN are generally used to share resources such as hardware devices like printers, scanners etc and commonly used for data transfer. LANs follow IEEE 802.3 standard. WLAN are also used where W stands for Wireless Connection which involves routers in place of modems. LAN enable stations to communicate directly using a common physical medium on a point to point basis without any intermediate switching node being required. Basic idea of LAN is to provide easy access of network resources and facilities between several interconnected systems.Also Read: IPv4 vs IPv6 - Difference between IPv4 and IPv6
Various standards were developed for WLAN which are IEEE 802.11a, 11b, 11g and 11n. Most of the WiFi enabled devices today supports IEEE 802.11n standard.
LANs provides following properties to the user :-
1. Flexibility
2. Speed
3. Reliability
4. Adaptability
5. Security
2. Speed
3. Reliability
4. Adaptability
5. Security
MAN
MAN stands for Metropolitican Area Network which ranges from buildings to cities. MAN is simply a group of several LANs connected over a larger region covered by single LAN connection. Data rate is higher than LANs but less than WANs and covers more distance than LANs in geographical terms. A typical example of MAN is Local Cable TV network. It uses similar technology as LAN and follows IEEE 802.6 standards. These provide data transfer between 100-500 mbps which can be increased further with the help of using new technologies as these can also make use of fiber optic transmission technology between sites. The MAN standard is organised around a topology and technique called Distributed Queue Dual Bus (DQDB).WAN
WAN stands for Wide Area Network which can range from countries to the whole world as well. The common term for WAN is internet. WAN consists of many LANs connected to cover large distances. Almost all the WANs uses store and forward subnets. WANs are the fastest networks and is mainly used for sharing of data over the network. Most WANs are telephone systems. WiMAX, GSM, CDMA, HSPA, LTE, fiber optics are some of the technologies supporting WAN. Covers distance upto 1000-10 kilo-meters. WANs can also use satellite or ground radio system.Difference between LAN, MAN and WAN
Parameter | LAN | MAN | WAN |
Area Covered | Covers small area i.e. within the buildings | Larger than LAN smaller than WAN | Covers large geographical areas |
Error rates | Lowest | Moderate | Highest |
Transmission speed | High | Moderate | High |
Equipment cost | Uses inexpensive equipments | Uses moderately expensive eqipments | Uses very expensive eqipments |
Standard | IEEE 802.3 | IEEE 802.6 | IEEE 802 |
Design and Maintenance | Easy | Moderate | Difficult |
Transmission Media | Co-axial Cable | Co-axial and Fiber optic cables | PSTN or Satellite links |
Uses | Used for time critical purpose. | Used for general purpose applications. | Used for non-time critical application. |
Comment below if you have queries or found any information incorrect in about article for difference between lan, man and wan.
Here you will get to know about some cool uses of OTG cable that you might not be aware of.
USB OTG stands for USB On-The-Go and is a type of USB which is mostly used to connect non-standard USB devices to other devices with USB and communicate with each other.
13 Cool Uses of OTG Cable That You Probably Don't Know
1. Connecting USB Enabled Keyboard with Android Device
Even though the Android keyboards (SwiftKey, Gboard, etc.) are great, there’s nothing better than a typical mechanical keyboard.
Using USB-OTG we could connect the USB-enabled keyboard with our Android devices and type much faster as compared to the generic Android Keyboard.

2. Connecting USB Enabled Mouse with Android Device
A mouse could be connected to an Android Device in a similar way as of the keyboard. Just connect the mouse using the OTG cable and when it is connected, a pointer would appear on the screen which you can use to scroll through pages, click on applications and do all basic things a mouse would normally do on computers.

3. Connecting DSLR Camera with Android Device
We can control almost every feature of the DSLR camera from an Android phone when it is connected to it using USB-OTG. Although, this requires an additional app (DSLR Controller (BETA) app) for accessing the features and controls of the camera.

4. Play Games using USB Enabled Gamepad
Some games can’t be played so well with the touchscreen when compared to the old school Gamepad, Fifa for example. Connecting a USB Gamepad solves this issue. Just plug the Gamepad with USB-OTG cable and you are good to go.

5. Connect to Internet using LAN Cable
We can connect to internet using LAN cable on an Android Device using USB-OTG to Ethernet adapter. This is useful if there is no Wi-Fi router or wireless network.

6. Printing using Android Device
We can print directly using Android device with printer manufacturer’s plugin installed and connection using OSB-OTG.

7. Transfer Data using Flash Drives
It is very common OTG cable use. We can transfer data between a Pen Drive and an Android device using USB OTG to connect them.

8. Use USB Modem to Connect to Internet on Android Device
USB Modem can be connected to the Android Device using USB-OTG to access Internet. After connecting the USB modem, we require an App (PPP Widget2) from the Play Store to Configure the USB Modem.

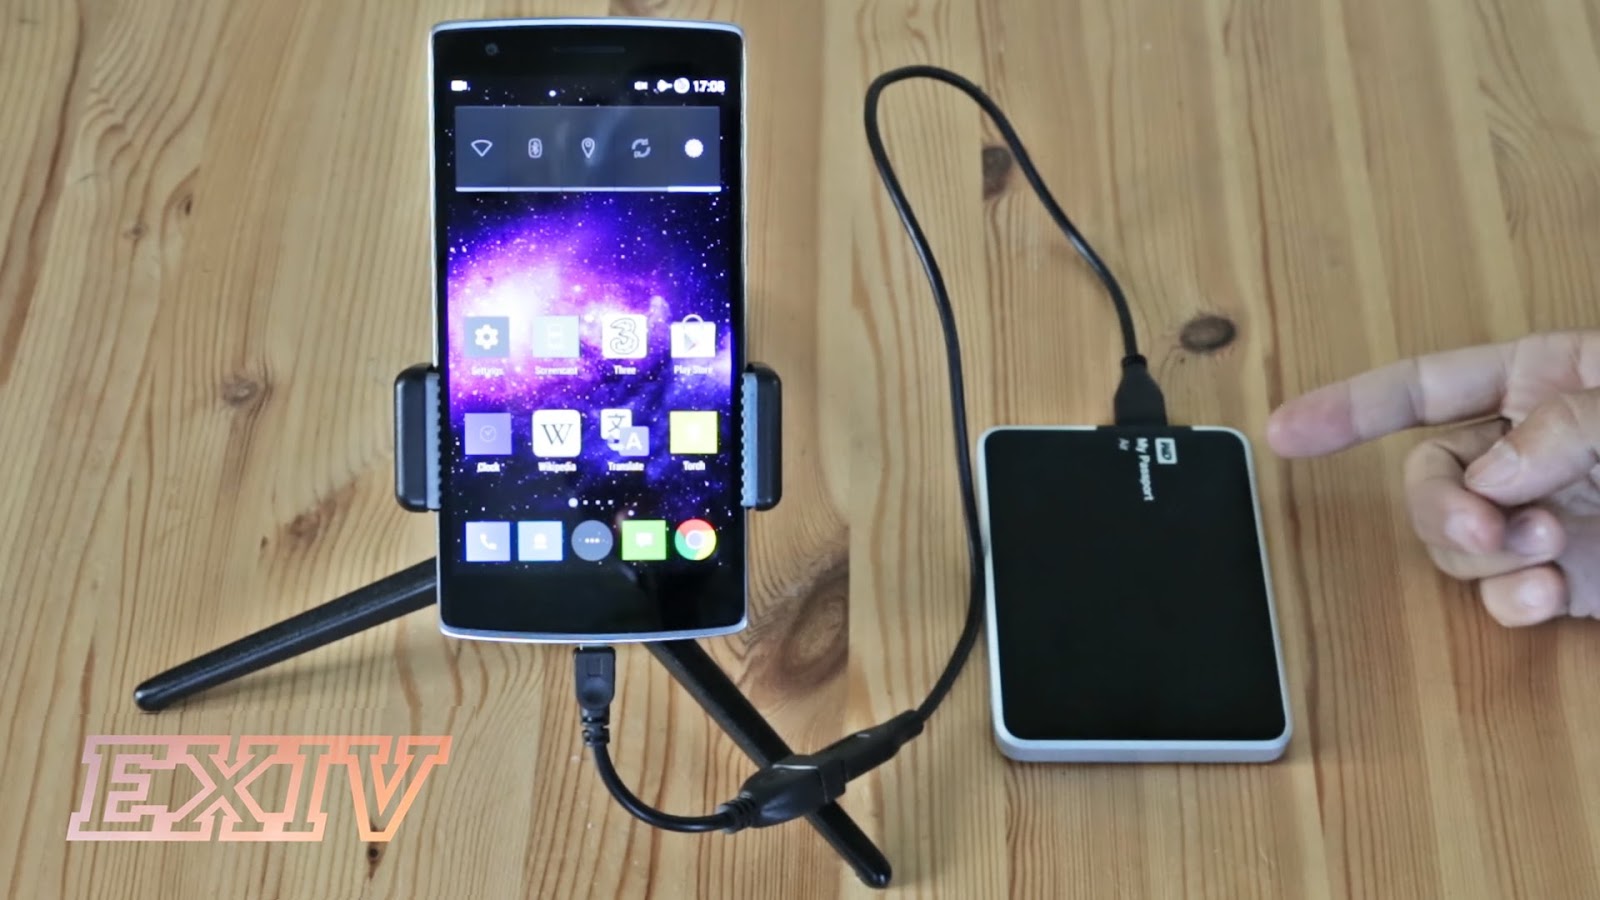
9. Access HDD on Android Devices
We can connect HDD to Android device using USB-OTG and ES File Explorer App to access the files in the HDD. This mostly works for FAT32 format and might not work with NTFS and newer file systems.
10. Connect Midi Keyboard with Android Mobile to Create Music
For this we require a midi cable and we can connect to an android device using USB-OTG. After this we must set the device in the Languages and Input option in the Settings Menu. After setup, we are good to go.

11. Use External Mic on Android Device
The mic present in most of android devices don’t provide high-quality audio recording. For this purpose, we could use external mic which could be connected using USB-OTG cable.

12. USB Fan on Android Device
USB Fan could be connected to Android Device using USB-OTG.

13. Connect USB Selfie Flash LED Light with your Android Phone
Clicking selfies in night is a problem as there is no front flash on majority of phones in the market. This issue could be solved by using a USB Selfie Flash LED Light connected through USB-OTG.

These were some cool uses of OTG cable. Comment down below if you know any other OTG cable uses that I have missed in this article.
In this article you will learn about IPv4 vs IPv6 i.e. difference between IPv4 and IPv6.
IPv4 addresses are 32-bit length and it could support up to 2^32 IP addresses in total about 4.29 billion addresses. With growth of the Internet and devices it is estimated that the unused IPv4 addresses will eventually run out within some time.

IPv6 works similarly to IPv4 as it allocates unique, numerical IP addresses for devices to connect to the internet or communicate. It has an edge over its predecessor as it utilizes 128 bit addresses which means it could support up to 2^128 Internet Addresses or approximately 3.4×10^38 addresses. This leads to it being represented in the hexadecimal system unlike IPv4 represented in decimals. This means that there are more than enough IPv6 addresses to keep the internet operational for many upcoming years.
There is inbuilt support of Internet Protocol Security (IPsec) in IPv6 whereas it is limited in IPv4. Apart from this fragmentation is done only by sender in IPv6 and incase of IPv4 it is done by both sender and forwarding routers.
There is inbuilt support of Internet Protocol Security (IPsec) in IPv6 whereas it is limited in IPv4. Apart from this fragmentation is done only by sender in IPv6 and incase of IPv4 it is done by both sender and forwarding routers.

Checksum field and Options fields are present in IPv4 header while as these both fields are absent in IPv6 header. IPv4 addresses are mapped to MAC Addresses using Address Resolution Protocol (ARP) where as in IPv6 Neighbor Discovery Protocol (NDP) is used instead of ARP.
IPv6 advances IPv4 with availability of Packet Flow Identification in IPv6 header in the Flow Label field which is absent in IPv4. Configuration of the IPv4 addresses are done either in Static (Manual) configuration OR Dynamic (DHCP) configuration mode. Auto-configuration of addresses are done in IPv6.
Multicast Group Membership is managed by Internet Group Management Protocol (IGMP) in IPv4 while it is done by Multicast Listener Discovery (MLD) messages in IPv6. Broadcast messages were present in IPv4 and absent in IPv6.
IPv4 vs IPv6 - Difference between IPv4 and IPv6
| IPv4 | IPv6 |
| Introduced in 1981. | Introduced in 1999. |
| They are 32 bit addresses. They are represented in decimals. | They are 128 bit addresses. They are represented in hexadecimals. |
| Decimal Notation Example: 192.168.10.1 | Hexadecimal Notation Example:2003:1CA7:0325:AB10:0321:7654:9810:DCAB |
| Header length is variable. | Header length is fixed. |
| In total, there could be about 4.29 billion addresses | In total, there could be about 3.4×10^38 addresses |
| Security features are optional. | Internet Protocol Security (IPsec) is inbuilt feature of IPv6. |
| Checksum field and Options fields are present in IPv4 header | Checksum field and Options fields are absent in IPv6 Header |
| Both Sender and Forwarding Routers perform Fragmentation. | Only the Sender performs Fragmentation. |
| IPv4 addresses are mapped to MAC Addresses using Address Resolution Protocol (ARP) | Here, Neighbor Discovery Protocol (NDP) is used instead of ARP. |
| Packet Flow Identification is absent. | Packet Flow Identification is present in the IPv6 header. |
| Configuration is done either in Manual (Static) or Dynamic (DHCP) mode. | Auto-Configuration of addresses are done. |
| Broadcast messages are present. | Broadcast messages are absent. |
Comment below if you have queries or found any information incorrect in about article for ipv4 vs ipv6 i.e. difference between ipv4 and ipv6.
In this article you will learn about difference between USB 2.0 and 3.0 i.e. USB 2.0 vs 3.0.
USB 2.0 was introduced in April 2000 and it could provide up to 500 mA for power usage and could be used in charging of devices. It had 4 wires within the cable and had a high speed of 480Mbit/s. It had support for extensions and even for USB hubs which are very useful when handling multiple devices.

Now devices like smartphones, tablets, input/output devices could directly be connected to a computer and USB ports could charge up these devices thus replacing the requirement of power adapters and chargers.
With all these improvements, USB 2.0 still had issues like only one-way communication at one time (Polling mechanism), that is it could either send or receive data only one at one time. This made it quite inefficient of what it had to deliver to the user in spite being providing much more compared to its predecessor.
These issues were dealt when USB 3.0 was introduced and USB Implementers Forum (USB-IF) took control of the management of the company (USB 3.0 Promoter Group).
USB 3.0 now used two data paths which are unidirectional and received data from one and to send data using other simultaneously (Full Duplex). USB 2.0 could send or receive data only one at a time and not together (Half Duplex). This means USB 3.0 is more efficient than the previous versions in terms of data transfer.
USB 3.0 also holds up to 900 mA which means USB 3.0 devices provide more power when needed and conserve power when the device is connected but idling.
In USB 3.0, data transfer starts by the host making a request then getting a response from the other end which could be another device or storage like Flash Drives. Then the other end either accepts or rejects the request. If the request is accepted, data is sent or accepted from the host. If there is a lack of data or available space in the device then the device sends a Not Ready (NRDY) signal to the host that it is not able to process the request. Otherwise, it sends an Endpoint Ready (ERDY) to the host to reschedule the transaction. Therefore, we conclude that it lets a device asynchronously notify the host of its readiness.
USB 3.0 was launched with what is called as “SuperSpeed” transfer mode which has backward compatible plugs, meaning compatibility with USB 2.0. This meaning a USB 3.0 product could be used in a USB 2.0 port but will perform at the same level meaning its speed and power couldn’t be fully used.
However, USB 3.0 cables cannot be used with USB 2.0 and USB 1.1 peripherals.
Physically, USB 2.0 and USB 3.0 don’t have many differences in terms of appearance as USB 3.0 is backward compatible and can be used in 2.0 sockets. But sometimes the 3.0 connectors are colored blue to differentiate between the two.
USB 3.0 could also be comparatively more expensive than its predecessor because of technical advancement and being newer technology.
Thus, we conclude that 3.0 is a better choice when it comes to data transfer and even power transfer to devices.
Comment below if you found any information incorrect or missing in above article for difference between USB 2.0 and 3.0.
USB 2.0 was introduced in April 2000 and it could provide up to 500 mA for power usage and could be used in charging of devices. It had 4 wires within the cable and had a high speed of 480Mbit/s. It had support for extensions and even for USB hubs which are very useful when handling multiple devices.
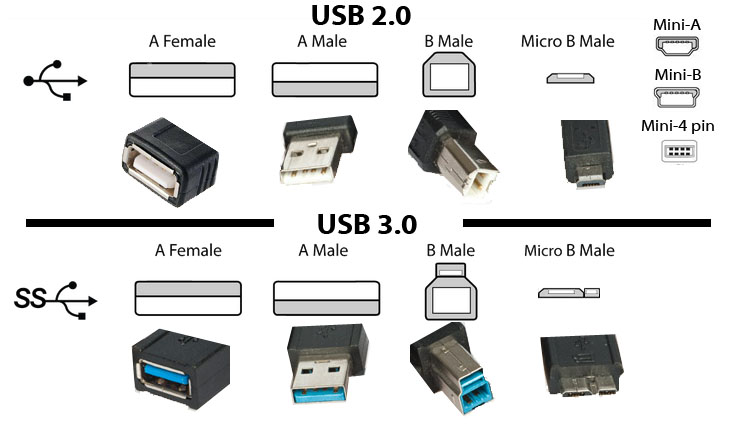
USB Connectors (2.0 and 3.0) - Image Source
Now devices like smartphones, tablets, input/output devices could directly be connected to a computer and USB ports could charge up these devices thus replacing the requirement of power adapters and chargers.
With all these improvements, USB 2.0 still had issues like only one-way communication at one time (Polling mechanism), that is it could either send or receive data only one at one time. This made it quite inefficient of what it had to deliver to the user in spite being providing much more compared to its predecessor.
These issues were dealt when USB 3.0 was introduced and USB Implementers Forum (USB-IF) took control of the management of the company (USB 3.0 Promoter Group).
USB 3.0 now used two data paths which are unidirectional and received data from one and to send data using other simultaneously (Full Duplex). USB 2.0 could send or receive data only one at a time and not together (Half Duplex). This means USB 3.0 is more efficient than the previous versions in terms of data transfer.
USB 3.0 also holds up to 900 mA which means USB 3.0 devices provide more power when needed and conserve power when the device is connected but idling.
In USB 3.0, data transfer starts by the host making a request then getting a response from the other end which could be another device or storage like Flash Drives. Then the other end either accepts or rejects the request. If the request is accepted, data is sent or accepted from the host. If there is a lack of data or available space in the device then the device sends a Not Ready (NRDY) signal to the host that it is not able to process the request. Otherwise, it sends an Endpoint Ready (ERDY) to the host to reschedule the transaction. Therefore, we conclude that it lets a device asynchronously notify the host of its readiness.
USB 3.0 was launched with what is called as “SuperSpeed” transfer mode which has backward compatible plugs, meaning compatibility with USB 2.0. This meaning a USB 3.0 product could be used in a USB 2.0 port but will perform at the same level meaning its speed and power couldn’t be fully used.
However, USB 3.0 cables cannot be used with USB 2.0 and USB 1.1 peripherals.
Physically, USB 2.0 and USB 3.0 don’t have many differences in terms of appearance as USB 3.0 is backward compatible and can be used in 2.0 sockets. But sometimes the 3.0 connectors are colored blue to differentiate between the two.
USB 3.0 could also be comparatively more expensive than its predecessor because of technical advancement and being newer technology.
Difference between USB 2.0 and 3.0
USB 2.0 | USB 3.0 | |
1. | It was introduced on April 2000 | It was introduced November 2008 |
2. | It consisted of 4 wires within the cable. | It consisted of 9 wires within the cable. |
3. | It has a maximum signaling rate of 480 Mbit/s | It has a maximum signaling rate of 5 Gbit/s |
4. | Can either send or receive at one time (Half Duplex). | Can send and receive data simultaneously (Full Duplex). |
5. | Can draw up to 500mA power. | Can draw up to 900mA power with better power efficiency. |
6. | A single cable without extension could be only 5m long. | A single cable without extension could be only 3m long. |
7. | Referred as HighSpeed. | Referred as SuperSpeed. |
8. | Usually black or gray colored. | Usually blue colored. |
Thus, we conclude that 3.0 is a better choice when it comes to data transfer and even power transfer to devices.
Comment below if you found any information incorrect or missing in above article for difference between USB 2.0 and 3.0.
In this article you will learn to convert dual audio movie to single audio.
Few days back I thought to watch a dual audio movie (hindi + english) on my TV. When I inserted the USB in TV and played the movie then by default it was giving english audio. Actually I wanted to play it in hindi audio but there was no option in my TV to switch between audios. I searched on internet and found a simple way to convert the dual audio movie in single audio using a software named as Format Factory. Luckily that method worked and I was able to watch my movie. :) :)
I thought to share the method so that others get benefited.
Download: http://www.pcfreetime.com/
2. Install the software and then open it. Now select the destination format in which you want to convert the video. Suppose you want to convert to MKV format, then select it. You can choose any other format that is supported by the device in which you want to play the video.

3. A new window will open, there click on Add File button to choose the video file.
4. Go to Output Setting and choose High quality and size option so that the quality of converted file should not decrease.

5. Click on Option button, this will open a window as shown in below image. There you will see all the available audio formats under Audio Stream option. Just choose the desired audio format and click on all OK buttons.

6. Click on Start button as shown in below image to start the conversion.

7. It is a little bit slow process so wait until it is done.
Finally you have your movie in desired audio format so go and enjoy it.
Comment below if you are facing any problem to convert dual audio movie to single audio.
Few days back I thought to watch a dual audio movie (hindi + english) on my TV. When I inserted the USB in TV and played the movie then by default it was giving english audio. Actually I wanted to play it in hindi audio but there was no option in my TV to switch between audios. I searched on internet and found a simple way to convert the dual audio movie in single audio using a software named as Format Factory. Luckily that method worked and I was able to watch my movie. :) :)
I thought to share the method so that others get benefited.
How to Convert Dual Audio Movie to Single Audio?
1. Go to below link to download Format Factor for free.Download: http://www.pcfreetime.com/
2. Install the software and then open it. Now select the destination format in which you want to convert the video. Suppose you want to convert to MKV format, then select it. You can choose any other format that is supported by the device in which you want to play the video.
3. A new window will open, there click on Add File button to choose the video file.
4. Go to Output Setting and choose High quality and size option so that the quality of converted file should not decrease.
5. Click on Option button, this will open a window as shown in below image. There you will see all the available audio formats under Audio Stream option. Just choose the desired audio format and click on all OK buttons.
6. Click on Start button as shown in below image to start the conversion.
7. It is a little bit slow process so wait until it is done.
Finally you have your movie in desired audio format so go and enjoy it.
Comment below if you are facing any problem to convert dual audio movie to single audio.
Here you will learn how to recover files from USB pen drive infected by shortcut virus.
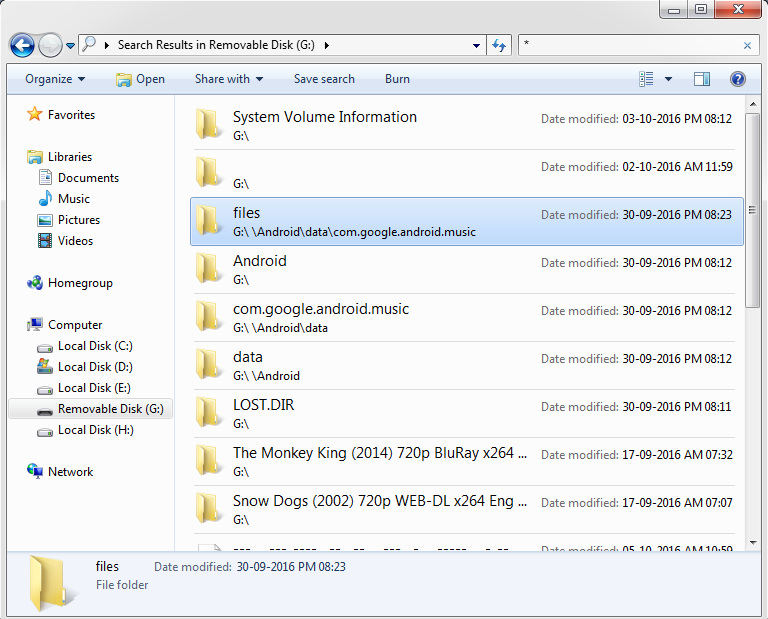
Open your USB drive and type * in the search box at top right corner. This will display all the files present in the pen drive. You can also search for a particular file by its name. Now you can easily copy the files that you want.
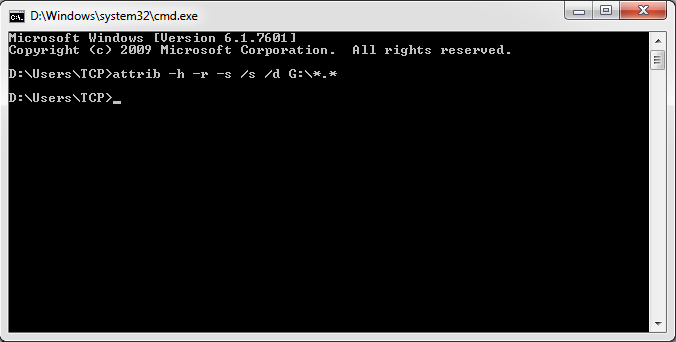
attrib -h -r -s /s /d G:\*.*
Pen drive shortcut virus is very common among windows users. Few days back I copied files from my friend’s pc to pen drive. When I inserted the pen drive in my pc then nothing was displayed except a shortcut. I checked the pen drive properties and found that it was using some space. It means the files are there but I was unable to access due the shortcut virus. I searched on internet and luckily found solution for this problem and successful recovered my files.
Below I am sharing all those possible solutions for this problem.
Below I am sharing all those possible solutions for this problem.
How to Recover Files from USB Pen Drive Infected by Shortcut Virus
Method 1:
It is one of the quickest methods to recover files.Open your USB drive and type * in the search box at top right corner. This will display all the files present in the pen drive. You can also search for a particular file by its name. Now you can easily copy the files that you want.
Method 2:
1. Open Command Prompt and type following command.attrib -h -r -s /s /d G:\*.*
2. Here G is the drive letter. Just replace it with your usb drive letter.
3. Now press enter to execute the command.
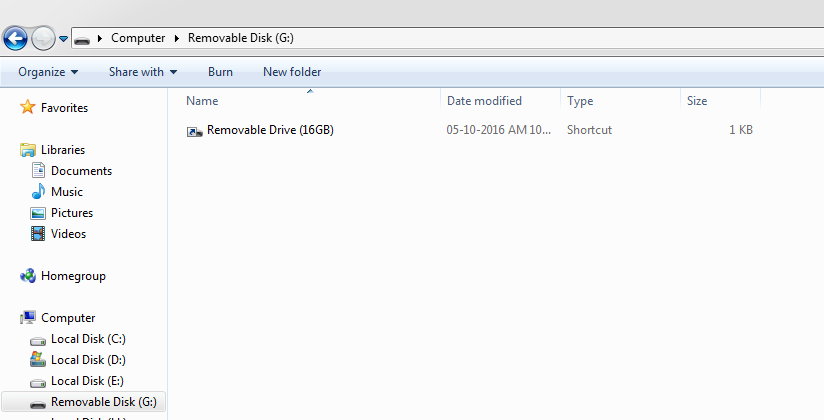
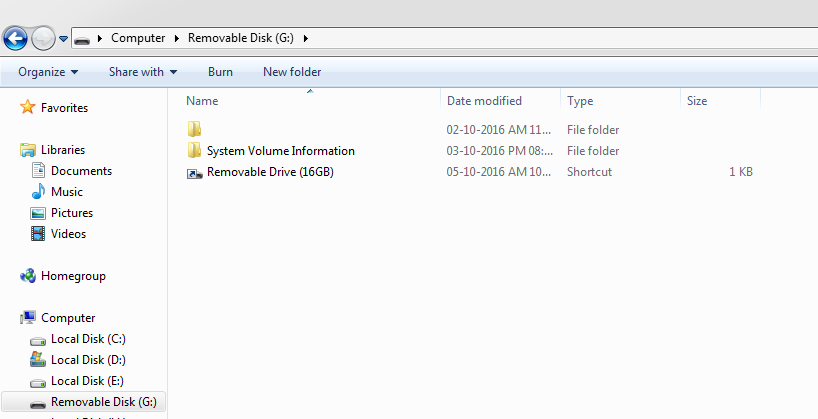
4. Open your usb drive, there you can see a folder without any name as shown in below image. It contains all the files.
3. Now press enter to execute the command.
4. Open your usb drive, there you can see a folder without any name as shown in below image. It contains all the files.
Method 3:
You can also use some data recovery software to recover your files. EaseUS data recovery software is best among all. You can download it from below link.Download: http://www.easeus.com/datarecoverywizard/free-data-recovery-software.htm
I hope this article helped you. Comment below if you are facing any problem.
I hope this article helped you. Comment below if you are facing any problem.
In this article I am sharing the list of top 5 best smartphones under 5000 in 2015. These are low budget smartphones with awesome features. All the phones that I have listed below are powered with quad core processor and have huge battery standby. If you are looking for some cheap and best smartphones below Rs. 5000 then I would suggest you to buy anyone of them. Lets checkout their price, specifications and features.

Price: Rs. 4,999
SIM: Dual Sim, GSM + WCDMA, (Dual Standby)
Primary Camera: 5 Megapixel, Auto Focus, Flash
Secondary Camera: 0.3 Megapixel
Internet: Wifi, EDGE, GPRS, 3G
Sensors: Accelerometer, Ambient Light Sensor, Proximity Sensor
Display: WVGA, 480 x 800 Pixels, LCD, 4 Inches
Battery: Li-Ion, 1950 mAh
Expandable Memory: microSD, upto 32 GB
Ram: 1 GB
Internal: 8 GB, User Memory 4.74 GB
OS: Windows v8.1
Processor: 1.2 GHz + Qualcomm Snapdragon, Quad Core
Price: Rs. 4,890
SIM: Dual Sim, GSM + GSM
Primary Camera: 8 Megapixel, Auto Focus, Flash
Secondary Camera: Yes
Internet: Wifi, EDGE, GPRS, 3G
Sensors: Proximity Sensor, G-Sensor
Display: FWVGA, 480 x 854 Pixels, IPS, LCD, 5 Inches
Battery: 1900 mAh
Expandable Memory: microSD, upto 32 GB
Ram: 512 MB
Internal: 4 GB, User Memory 1.27 GB
OS: Android v4.4 (KitKat)
Processor: 1.3 GHz, Quad Core
Price: Rs. 4,887
SIM: Dual Sim, GSM + WCDMA
Primary Camera: 5 Megapixel, Flash
Secondary Camera: 2 Megapixel
Internet: Wifi, EDGE, GPRS, 3G
Sensors: Accelerometer, Proximity Sensor, Light Sensor, G-Sensor
Display: WVGA, 480 x 800 Pixels, IPS, LCD, 4 Inches
Battery: 1500 mAh
Expandable Memory: microSD, upto 32 GB
Ram: 1 GB
Internal: 4 GB, User Memory 1.73 GB
OS: Android v4.4.2 (KitKat)
Processor: 1.3 GHz, Quad Core
Price: Rs. 4,801
SIM: Dual Sim, GSM + GSM
Primary Camera: 5 Megapixel, Flash, HD Recording
Secondary Camera: 0.3 Megapixel
Internet: Wifi, GPRS, 3G
Sensors: G-Sensor, Proximity Sensor
Display: WVGA, 480 x 800 Pixels, IPS, 4 Inches
Battery: 1500 mAh
Expandable Memory: microSD, upto 32 GB
Ram: 1 GB
Internal: 8 GB
OS: Android v4.3 (Jelly Bean)
Processor: 1.2 GHz + MSM8212, Quad Core
Price: Rs. 4,902
SIM: Dual Sim, GSM + GSM
Primary Camera: 5 Megapixel
Secondary Camera: 0.3 Megapixel
Internet: Wifi, GPRS, EDGE, 3G
Sensors: Gravitation
Display: FWVGA, 854 x 480 Pixels, TN Screen, 5 Inches
Battery: 2000 mAh
Expandable Memory: microSD, upto 32 GB
Ram: 1 GB
Internal: 4 GB
OS: Android v4.2 (Jelly Bean)
Processor: 1.3 GHz + MT6582M, Quad Core
Also check the best android game - stickman soccer game
Top 5 Best Smartphones Under 5000 in 2015
Lava Iris Win1
Price: Rs. 4,999
SIM: Dual Sim, GSM + WCDMA, (Dual Standby)
Primary Camera: 5 Megapixel, Auto Focus, Flash
Secondary Camera: 0.3 Megapixel
Internet: Wifi, EDGE, GPRS, 3G
Sensors: Accelerometer, Ambient Light Sensor, Proximity Sensor
Display: WVGA, 480 x 800 Pixels, LCD, 4 Inches
Battery: Li-Ion, 1950 mAh
Expandable Memory: microSD, upto 32 GB
Ram: 1 GB
Internal: 8 GB, User Memory 4.74 GB
OS: Windows v8.1
Processor: 1.2 GHz + Qualcomm Snapdragon, Quad Core
Karbonn Titanium S2 Plus
Price: Rs. 4,890
SIM: Dual Sim, GSM + GSM
Primary Camera: 8 Megapixel, Auto Focus, Flash
Secondary Camera: Yes
Internet: Wifi, EDGE, GPRS, 3G
Sensors: Proximity Sensor, G-Sensor
Display: FWVGA, 480 x 854 Pixels, IPS, LCD, 5 Inches
Battery: 1900 mAh
Expandable Memory: microSD, upto 32 GB
Ram: 512 MB
Internal: 4 GB, User Memory 1.27 GB
OS: Android v4.4 (KitKat)
Processor: 1.3 GHz, Quad Core
Karbonn Titanium S4 Plus
Price: Rs. 4,887
SIM: Dual Sim, GSM + WCDMA
Primary Camera: 5 Megapixel, Flash
Secondary Camera: 2 Megapixel
Internet: Wifi, EDGE, GPRS, 3G
Sensors: Accelerometer, Proximity Sensor, Light Sensor, G-Sensor
Display: WVGA, 480 x 800 Pixels, IPS, LCD, 4 Inches
Battery: 1500 mAh
Expandable Memory: microSD, upto 32 GB
Ram: 1 GB
Internal: 4 GB, User Memory 1.73 GB
OS: Android v4.4.2 (KitKat)
Processor: 1.3 GHz, Quad Core
Micromax Unite A092
Price: Rs. 4,801
SIM: Dual Sim, GSM + GSM
Primary Camera: 5 Megapixel, Flash, HD Recording
Secondary Camera: 0.3 Megapixel
Internet: Wifi, GPRS, 3G
Sensors: G-Sensor, Proximity Sensor
Display: WVGA, 480 x 800 Pixels, IPS, 4 Inches
Battery: 1500 mAh
Expandable Memory: microSD, upto 32 GB
Ram: 1 GB
Internal: 8 GB
OS: Android v4.3 (Jelly Bean)
Processor: 1.2 GHz + MSM8212, Quad Core
Lenovo A680
Price: Rs. 4,902
SIM: Dual Sim, GSM + GSM
Primary Camera: 5 Megapixel
Secondary Camera: 0.3 Megapixel
Internet: Wifi, GPRS, EDGE, 3G
Sensors: Gravitation
Display: FWVGA, 854 x 480 Pixels, TN Screen, 5 Inches
Battery: 2000 mAh
Expandable Memory: microSD, upto 32 GB
Ram: 1 GB
Internal: 4 GB
OS: Android v4.2 (Jelly Bean)
Processor: 1.3 GHz + MT6582M, Quad Core
Also check the best android game - stickman soccer game
Last night I installed windows 8 in my newly purchased hp laptop. After that I just jumped to hp official website to download the drivers for my laptop. Unfortunately windows 8 drivers were not available there. I searched a lot but failed to find the right drivers for my model number. You may also face this kind of situation. After doing some research I found one great solution for this. I came across a software named as DriverEasy which automatically detects the missing drivers in windows and also provide option to download them. DriverEasy is capable of detecting missing drivers in windows xp, vista, 7, 8 and 8.1 for both 32 and 64 bit. It doesn’t matter which company’s laptop or computer you are using. It is smart enough to detect and download the drivers.

As many more people faces the same problem so I thought that I should share this solution with you guys. So below I am sharing the step by step process by which you can automatically detect and install missing drivers in windows easily.
https://www.drivereasy.com/
2. Now just run it and click on Scan Now button to start scanning for missing drivers.
3. DriverEasy scans your whole system and shows a list of all missing, outdated or mismatched drivers.
4. After that click on Get Drivers button as shown below.
5. Now download the drivers that you need. It will take few minutes depending on your internet speed. In case your downloading is failed due to some internet connection problem then don’t worry. The download process will resume from where it was stopped.
6. When downloading is finished, click on Install option to install the required drivers. Make sure to restart your system after finishing the installation process so that drivers get activated.
So this was the simple method to automatically detect and install the missing drivers on your pc or laptop. I am sure that there is no other method better than this. If still you know any other good way to do this then please mention it by commenting below. You can also ask your queries if you are facing any problem.
As many more people faces the same problem so I thought that I should share this solution with you guys. So below I am sharing the step by step process by which you can automatically detect and install missing drivers in windows easily.
How to Automatically Detect & Install Missing Drivers in Windows Xp, Vista, 7, 8 and 8.1 (32 & 64 bit)
1. First of all download DriverEasy setup from below link and then install it.https://www.drivereasy.com/
2. Now just run it and click on Scan Now button to start scanning for missing drivers.
3. DriverEasy scans your whole system and shows a list of all missing, outdated or mismatched drivers.
4. After that click on Get Drivers button as shown below.
5. Now download the drivers that you need. It will take few minutes depending on your internet speed. In case your downloading is failed due to some internet connection problem then don’t worry. The download process will resume from where it was stopped.
6. When downloading is finished, click on Install option to install the required drivers. Make sure to restart your system after finishing the installation process so that drivers get activated.
So this was the simple method to automatically detect and install the missing drivers on your pc or laptop. I am sure that there is no other method better than this. If still you know any other good way to do this then please mention it by commenting below. You can also ask your queries if you are facing any problem.
Do you ever faced wii error code 51330 while using internet ? Well here we have described the method to solve nintendo wii error code 51330. Wii error 51330 is generated because of some mis-configuration on your router via which you are accessing internet. Due to this error you are not able to connect internet ! There are so many types of reasons due to which this nintendo wii error 51330 occurred .Most of the people face reason when wireless security pass-code on your home network is typed incorrectly on wii console or it may be wrong.
Sometimes this error occurs due to firewall setting, due to some settings you are stopping your system to access the internet . So lets get started.

Sometimes this error occurs due to firewall setting, due to some settings you are stopping your system to access the internet . So lets get started.
How to fix wii error code 51330
Well the solution of error code 51330 is different for the different reason. It is completely depends on the reason due to which error 51330 occurred . Though here we will cover most of the cases with solutions. So after trying you will be able to solve wii error code 51330.
Here we are describing different solutions to fix error code 51330
EXIT
So these all are methods to solve wii error 51330. We hope that nintendo error code 51330 is solved now. If you still facing same issue than just comment here the difficulty. We will help you to solve.
Here we are describing different solutions to fix error code 51330
- Check your router for MAC filtering. If it is in enable mode than just put your systems MAC address inside the box. If you yet don't find ,then simply disable MAC filtering option.
- Go to wii setting and check IP address and DNS settings manually.Try to write by urself rather than automatically.
- If you have made any changes in router security like WEB to WPA of WPA2 PSK , then simply check the same encryption settings to wii console online. Both should be same.
- Sometimes you enters the wrong security key for WPA or WEP . At that time you make sure that its correctly.
- At last,if above solutions doesn't work out for you. Than just go to command prompt and write
EXIT
- Then unplug or restart your router to see weather it is fixed or not.
- Disable firewall option : Sometimes due to firewall settings you can't access the internet in your system. So disable and try to connect internet.
- Set Default ip : Set your ip address to default if its changed by your internet provider
- Try to change your router's broadcast channel from 1 or 11 and also change mode of browser G to Mixed.
- At last,try to update Firmware of your wifi router for latest configuration .
- Unplug your wifi router wait for some minutes and then start again and wait until it setups all and then start to access internet.
So these all are methods to solve wii error 51330. We hope that nintendo error code 51330 is solved now. If you still facing same issue than just comment here the difficulty. We will help you to solve.